Adjusting and Creating Asset Properties
Flow asset manager is using the special properties system, strictly connected to Blender drivers system. You can add the properties to your assets, so they are easily customizable as the instances, without the need of editing them directly. You can also place the various versions of one assets in various scenes.
Adjusting properties and color
If the asset is using the properties, the sliders will show in Flow addon panel in 'Properties' subpanel. The changes will affect only the local instance, not the root file. Please note that when you have your instance collection duplicated, tweaking the sliders will affect all of those instances (exception when the objects material are using 'Object info -> Color' node). If you have multiple duplications of one collections, but you want to tweak only this single object, use 'Single-user Instance' button from the Instance Tools subpanel.

Important! Only local instances may have the properties tweaked. If you have the linked instance, you must first make it local to use the properties. However you can change your objects color if one of the material is using 'Object Info' node with the 'Color' Output
Adding custom properties
When the selected object is the editable one, you may easily add new properties and connect them to any sliders in Blender via the drivers. If possible, you'll se 'Add New Property' button in the Properties subpanel in Flow Addon. While adding the property, you may use one of the three property types - Number (Float) property, RGB Color Property, RGBA Color Property.

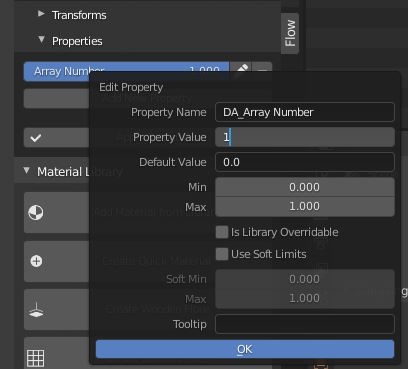
Adding number (float) properties
Set the desired values in the popup window. The value and limits are quite individual and will depend on the slider values, that you want to connect your property to. For example, if you are going to tweak some basic sliders of the 'Principled BSDF' shader node eg. Metallic, Roughness, Specular, you should set your property min-max for 0.0-1.0. But if you want to tweak the array number, the min-max should be 1-any limit.

Setting the value step (whether you want to use the decimal numbers) is not available from creation popup. You can set it when the property is created. Click on the pencil icon next to the property to edit it, and type the property value's decimal places as desired. If you want your step to be a full number, simply change 1.0 to 1. If you want to use decimal numbers, change the number format to 1.0
Adding color properties
Adding the color props is simplier than adding float properties. Simply select RGB / RGBA Color, select the default color and click OK.

Connecting properties to the objects
The created properties are not tweaking anything yet, as they are not connected to any other property.
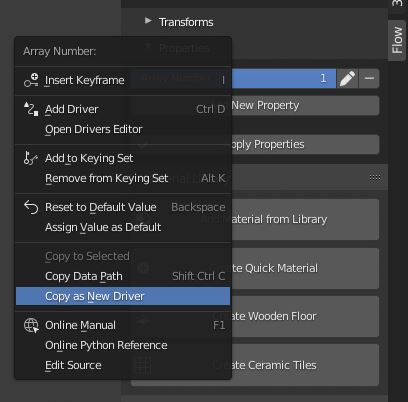
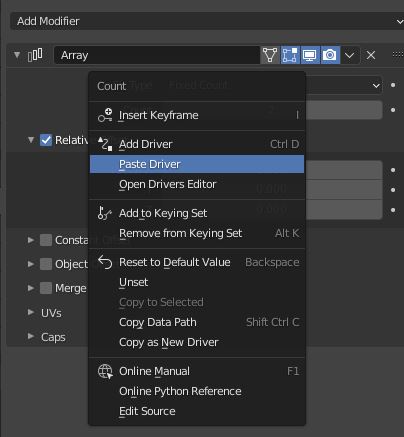
Connecting the number property
To connect the float property, right-click on the property slider in the Flow panel, and select 'Copy as New Driver'. Go to the desired property that you want to be driven (eg. to some shader node), right-click on the destination slider and select 'Paste Driver' option from the menu. As you can see, you cannot tweak the driven slider directly, it's value can be now changed only by tweaking the property in the panel.
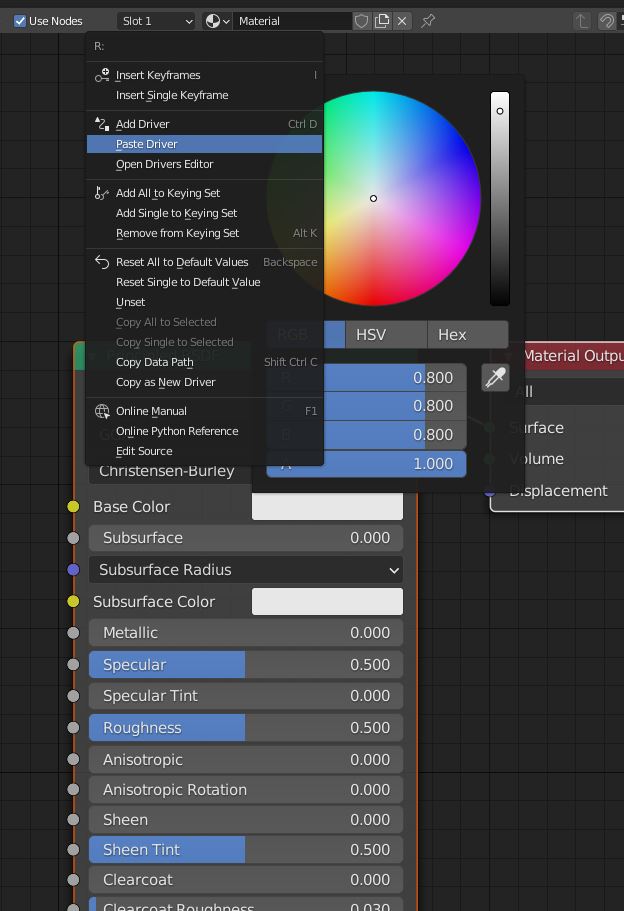
Connecting the color property
Due to the Blender limitations, connecting the color property is a little bit more complicated, as you need to repeat the above actions three / four times.
- Click on the color property to open the RGB circle. Select RGB, to see it's R, G and B values below
-
Right-click on the R value, and select 'Copy as New Driver'

-
Go to the color that you want to be driven. Click on it, and also select RGB. Right-click on R value, and select 'Paste Driver' from the menu.
-
Repeat the actions with the G and B values (also with A if you are using RGBA) <- Very important!
- When completed, the color in the properties subpanel should be the same as the destination color.
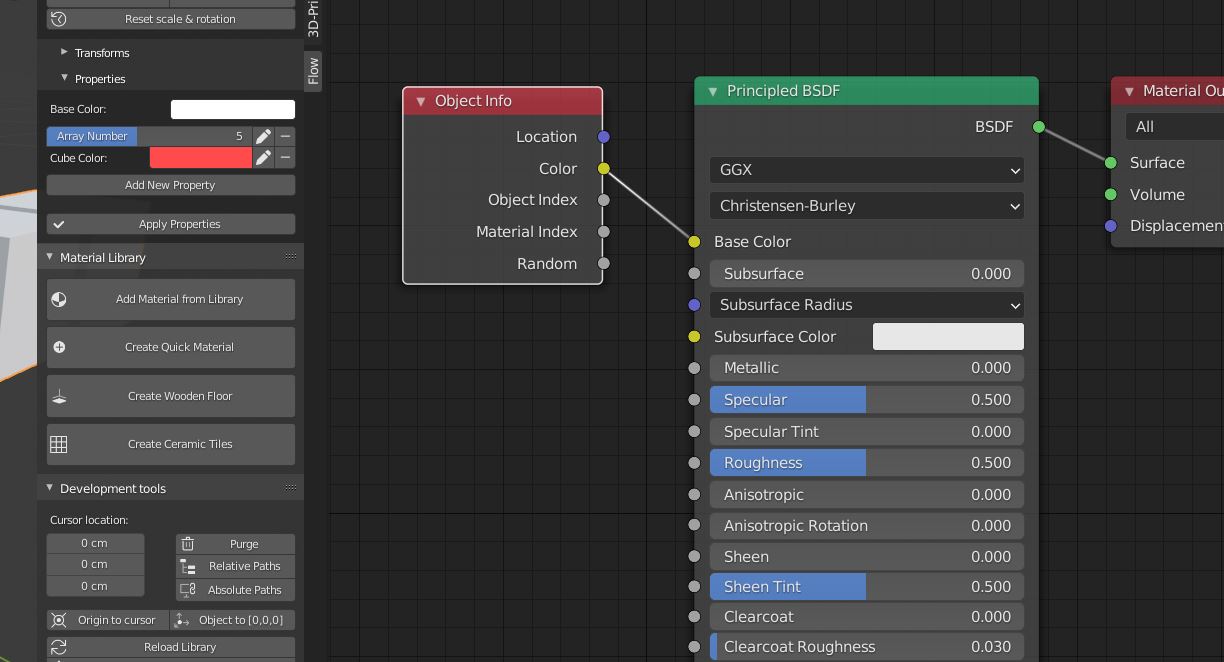
Using the 'Object info' Node as a color property
You can substitute the above method by using the 'Object info' node in the shaders editor. Simply add the 'Object info' node and connect it's Color output to any color socket you want. The Base Color property will appear automatically in the panel.
Pros and cons of using 'Object info' nodes:
- This method is recommended only when you want to tweak one base color in the materials node
- When you place the asset as the instance collection, you may set different base colors for different instances, without making them single-users. This couldn't be achieved by using custom color property.
- If multiple objects in the instance collection are using 'Object info > Color', all of them will receive THE SAME value. So it's not possible to tweak two colors in one instance with 'Object info' nodes.