Getting Started
Keyboard Shortcuts
Object Mode
- CTRL + X - Quick Transforms pie menu
- CTRL + SHIFT + X - Flow Main Menu
- CTRL + SHIFT + D - Quick Duplicate selection to 3d Cursor
- CTRL + SHIFT + V - Paste objects from buffer in 3d cursor
- SHIFT + A - Add Object from Library / Add Asset (in the bottom of Blender Add object menu)
Shader Editor
- CTRL + X - Add Texture from Library
- CTRL + SHIFT + X - Add Node Group from Library
Sculpt Mode & Texture Paint Mode
- CTRL + X - Pie Menu of Brush Manager
Plugin installation & Configuration
IT IS STRONGLY RECOMMENDED TO INSTALL THE PLUGIN AND SET LIBRARY PATH IN THE NEW, NOT-SAVED BLENDER FILE!
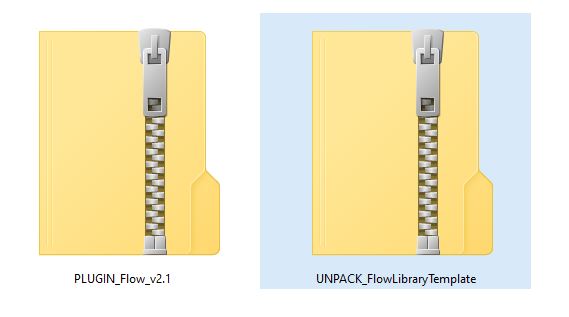
- The Addon consists of two .zip files - the plugin, and the exemplary library (or the asset library if you purchased Flow with Interior Essentials). You must first unpack the marked asset .zip file to any location, just remember it's filepath. Then you need to install the other .zip file via Blender. You can also skip unpacking the exemplary assets. If you want to start your library from scratch, you can create the folder later, during the plugin configuration.
- Open Blender, go to Edit > Preferences, switch to the Add-ons tab, and click "Install..." button.
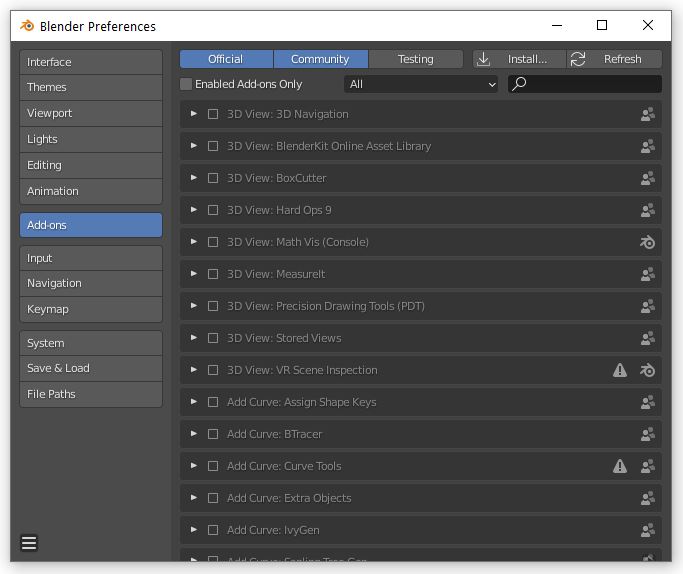
- Find the PLUGIN_InteriorEssentials_X-X.zip file, select this file, and click "Install Add-on"

- Enable the plugin.
- Click Install Pillow button - this will install the Python library, that manages Blender Image Preview (BIP) Library, developed by 3D Ninjas. If you've already installed Pillow, you should not see this button.
Libraries Configuration
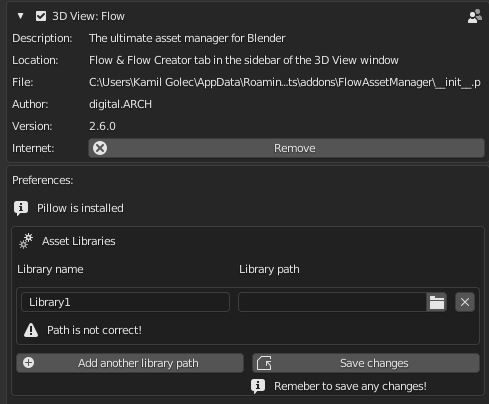
When the addon is installed, you need to configure your library / libraries path - installing the exemplary library or creating library from the scratch.
Since Flow 2.5, you can add multiple library paths into the plugin and switch between them in the plugins UI
- Click Add Library Path button to add your first library path.Then click on the folder icon in the end of 'Library Path' column. In the Blender file browser find the path, where you've unzipped your library (Interior Essentials / Flow Startup Library etc.) Select the MASTER folder - the one containing 'models', 'textures', 'materials', 'node_groups', 'file_templates', 'hdri', 'brushes' folders. The plugin will notify you whether the library is installed correctly or not. If the library path is correct, you will see the checkmark right after the library path.


- If you don't need to use the exemplary assets, you may create your own library from scratch anywhere. Open the library path browser and go to the folder, where you want your library to be located. Then click 'Accept'. Below the directory path, you'll see the button to create the library. Simply click on it, and the Flow Library folder will be generated in the selected location.
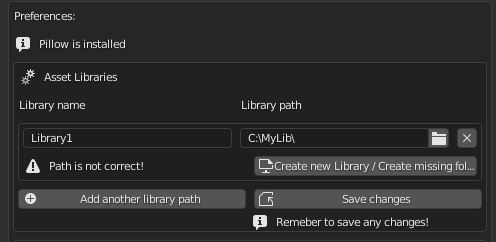
The correct path should look like this:

- When the path is set correctly, name your library in the Library Name column. This name will be shown in the plugin to represent the library.
- Click 'Save Changes' to save your library path!
- You may add as many libraries as you want, to keep your files organized. Simply repeat the steps described above.
- If at least one library path is set, you can already start using the plugin or tweak some preview render settings. You will find the 'Flow', 'Asset Painter' and 'Flow Creator' Panels on the right side of the 3d viewport. If you don't see the panels, press 'N'. The easiest way to add assets is setting the 3d cursor, and clicking 'Shift + A'

Warning!
If you purchased the package (e.g. Interior Essentials), remember to unzip the asset archive first!
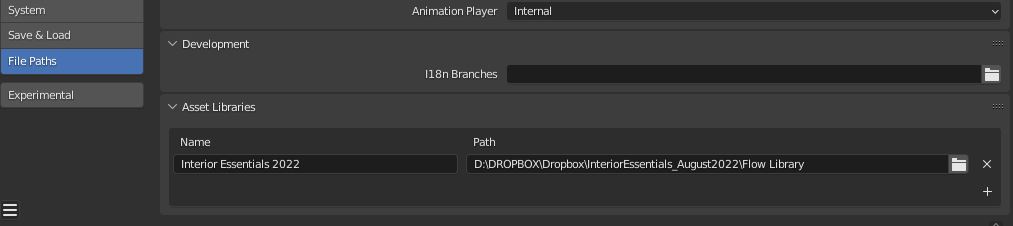
Connecting Library to Blender Asset Browser
To see all your newly added assets in Blender Asset Browser, you first need to connect the library to that system. Open Edit -> Preferences and go to the File Paths tab. You should find Asset Libraries subpanel there. Add new library with pressing + and set up the path, exactly as you've done in the Flow configuration. Since now, you will see all your new assets in the Blenders native Asset Browser under the specified library.
Important! You will not see your older assets here, unless they were marked as Blender asset before. You will only see the assets added with Flow 3.0 or newer. For that moment we've found no good way to remark your existing Flow assets automatically
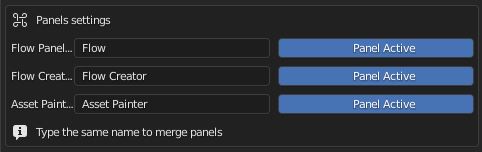
Panels Configuration
Flow Plugin consists of 3 panels - 'Flow', 'Asset Painter' and 'Flow Creator'. Each of them provides the different set of tools. You can rename, merge or toggle Flow Panels. You can find the configuration boxes right under the libraries paths.
You can merge panels by typing exactly the same name for each of them
Even if you deactivate all of the panels, you will still be able to open Flow menus with 'CTRL + X', but some tools may not be available.
Previews Render configuration
- In this place, you can configure the simple render settings, that will be used for creating the previews for your assets, while adding them to the library with the plugin.
- On the bottom, you can select if you want to use your custom HDRi for previews renderings. Select this option and select the desired .hdr file. If the path or file will be incorrect, the plugin will use the default hdri

First Steps
- The plugin's main functionality is contained in the Interior Essentials panel in the Preferences tab in Object Mode and Edit Mode. You should see this tab, when you click 'N'. To start using the plugin, open the Interior Essentials panel.
- Most functions will be available only in the Object Mode. In the Edit Mode only material functions are available.
- To add the object in the desired spot, you first need to place the 3d Cursor (Shift + RMB in Blender 2.8+). Then click 'Add Object from Library', select the category and object, then click OK to place the asset.
- By default, the asset instance will be appended to your local file library, so you could adjust the properties. If you don't need the properties and you want to keep file smaller, check 'Link the instance'
- To learn more about adding and adjusting the assets, check the Adding & Customizing Assets
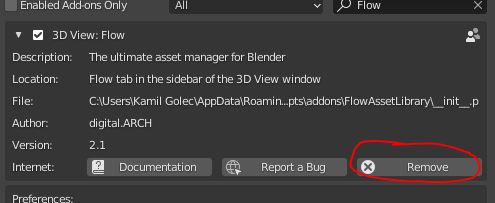
Updating the product
- To update Flow addon, the best is to remove the current version from Blender first in the preferences window. Then install the new .zip file, following the instructions above. This will not affect your library and your projects
- To update the assets, simply unpack the new .zip file containing the master folder anywhere, copy all it's content, and paste it to the place, where you've already have your asset files. You should merge the folders and replace all the existing file, to have the latest versions of the assets - huge part of them has been rebuild in the Interior Essentials Version 2.0+
- If you are updating from version 1.X to version 2.0+, you should consider the 'clean' installation in another place, to keep your assets in the your old projects. In order to simplify the library and erase the reskinned models, many of them has been removed or renamed, so there may be missing assets in your projects, if you replace them.
- You may use File -> External Data -> Find Missing Files Operator in Blender to find the missing files if you've moved your installation folder OR you can use 'Find Missing Files' button in the Flow panel to look for your missing files just in the selected Flow directory.
Creating the missing folders (updating the plugin 2.1 -> 2.6)
Earlier version may have not include all the folders, like 'hdri' or 'node_gropus'. If any of the library folders are missing in your old Flow library, you will be notified after installing the new version of the plugin (following the instructions above). To create missing folders, just click the button below the filepath, and all the missing directories will be created automatically in your Flow directory.

Warning!
In version 2.1, the materials library system has been rebuilt. The old Interior Essentials materials library (before February 2021 update) will not work properly with the newest addon. Download the updated library from BlenderMarket, remove your old 'materials' folder from the installation directory, and paste the new 'materials' folder. You should notice, that there is not single materials file no more, but there are materials blend files separated in each category