Creating custom assets
Flow addon allows you to add ANY objects and materials from your scene to the library in a very simple way.
Asset Browser Support
Since Flow 3.0, all models and materials will be also marked as Blender Assets, and will be accessible with Blender Asset Browser. Mind that collections in asset browser are supported only since Blender 3.2!
Adding models to the Flow library
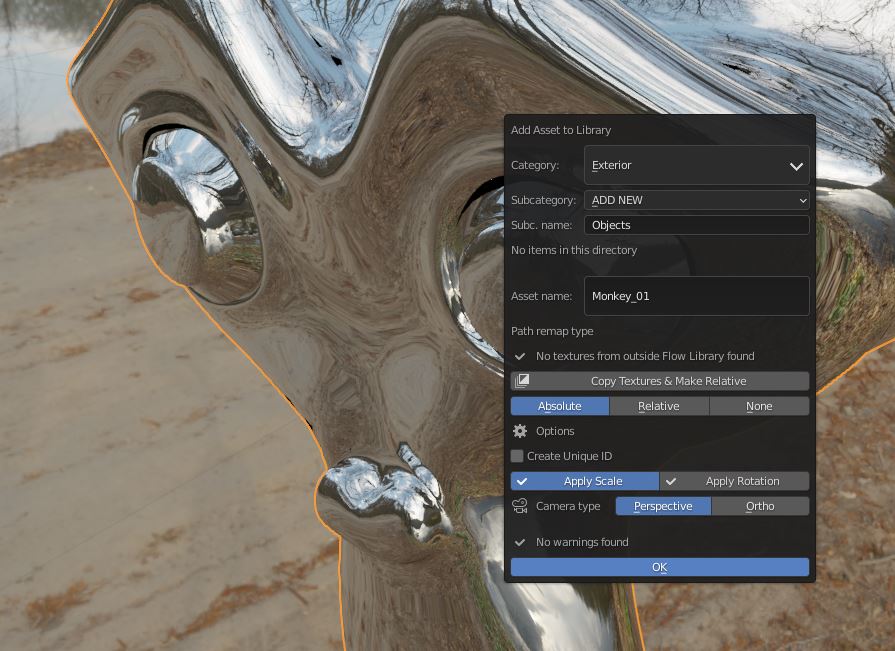
Add Asset to Library operator
- Select the desired objects, that you want to add to the library.
- We recommend to duplicate the objects somewhere outside the scene, for the easier workflow (but this step is not necessary)
- Select the active object and set it's origin as a desired placing point, when you'll be adding the object from the library. You may simply place the 3d cursor on the desired spot and click 'Origin to cursor' in the Development Tools panel in Flow addon
- Make sure that the object is facing the front view to have the good looking preview thumbnail.
- When the desired objects are selected, click Add Asset to Library button (or select it from Ctrl + Shift + X menu)
- You may now select one of the existing categories or add new. Do this step also for the Subcategory (or leave blank if you want your object to be accessible directly from the category folder)
- Select path remapping type:
- If any textures from outside the Flow Library will be found in your selected objects, you will be notified. Then YOU HAVE TO SET THE PATH REMAP TYPE! Otherwise when you place the asset, the textures may be missing.
- Copy Textures & Make Relative - new feature that allows you to automatically copy all the textures from outside the Flow Library into the Flow Library folders (textures/Custom Assets/[asset_category]/[asset_name]). All the textures in the current file will be replaced by the Flow Library textures, and when the asset will be created, paths to this textures will become relative
- None: all filepaths from your blend file (textures etc.) will remain unchanged. This may cause the unexpected results when using the relative paths.
- Relative: Remap paths that are already relative to the new location.
- Absolute: Make all paths absolute on writing. Recommended option when you are using any directories from outside the Flow library directory.
- Type the asset name. You will be notified if the file with the same name already exists in the selected category & subcategory. You may continue if you want to replace the asset with the new one. You may also select 'Create Unique ID' to create the randomly generated name (or suffix if you've typed the name). This feature is recommended if you may use the same name for objects in various directories.
- Camera type - You may select if the preview will be rendered with the Orto or Perspective camera. By default, the setting in the popup window will be the one from the properties, changing it in this operator will use the selected camera type just a single time, this will not affect the preferences setting.
- Apply Scale & Rotation - you can select if the scale and rotation for the selected objects is to be applied. Mind, that if objects are using modifiers, shape keys or they have linked data, the error may be raised.
- Click OK when ready. NOTE! This action may take a few seconds to complete, as the preview image is rendering automatically in the background. If this action takes too long, consider changing your preview render settings in the addon preferences
Create Asset Template

It is highly recommended to use this option ONLY on the new and empty .blend files This option allows you to add your models in more controlled way, but is recommended only for more advanced users.
- Open new Blender instance and click Create Asset Template in the Flow addon panel. This will create the basic asset template with the main asset collection, and _preview collection containing the camera.
- You may now paste the objects (or create the new models from scratch). They should be placed in the main collection.
- Set up the asset data - select the category and subcategory (or leave it empty), type the asset name (the main asset collection will be automatically renamed - it is important for the asset to load properly)
- It is optional, but you can replace the .hdri file with yout custom one.
- When objects are ready to be rendered, you may automatically set the camera range, by clicking 'Camera fit to Objects'. The camera will fit to the objects, contained by the asset collection.
- Click 'Save Asset File' in the bottom, to save the file in the selected category directory. The path will be created automatically, if the plugin is installed correctly.
- Click 'Render Asset Thumbnail' to render the preview image. It will be automatically saved in the category directory.
Adding Materials to the Flow library

You may easily add any material to the library, using the Flow addon, so you could use it in your later projects.
- Select the object containing the material, that you are willing to add to the library. Note, that it must be an editable object with directly editable materials (eg. mesh / curve / text). You will not see this option when eg. instance collection is selected.
- Click Add Material to Library
- In the popup window, you'll find the list of all materials linked to this object. Select the desired one and continue.
- Check whether you want your preview object to be Sphere or Cube
- Select the category and subcategory (or leave it blank)
- Select path remapping type:
- If any textures from outside the Flow Library will be found in your selected objects, you will be notified. Then YOU HAVE TO SET THE PATH REMAP TYPE! Otherwise when you place the asset, the textures may be missing.
- Copy Textures & Make Relative - new feature that allows you to automatically copy all the textures from outside the Flow Library into the Flow Library folders (textures/Custom Materials/[material_category]/[material_name]). All the textures in the current file will be replaced by the Flow Library textures, and when the asset will be created, paths to this textures will become relative
- None: all filepaths from your blend file (textures etc.) will remain unchanged. This may cause the unexpected results when using the relative paths.
- Relative: Remap paths that are already relative to the new location.
- Absolute: Make all paths absolute on writing. Recommended option when you are using any directories from outside the Flow library directory.
- You may type the new material name or leave the original one. You will be notified if the file with the same name already exists in the selected category & subcategory. You may continue if you want to replace the material with the new one.
- Click OK when ready. NOTE! This action may take a few seconds to complete, as the preview image is rendering automatically in the background. If this action takes too long, consider changing your preview render settings in the addon preferences
Adding Assets to Blender Asset Browser
To see your new assets in Blender Asset browser, there are no extra steps, that you need to follow. You just need to have your Flow Library set also as Blender Asset Library. While adding models, you will be able to set whether you want to mark your asset as collection or object - it will only affect the format for Asset Browser. Asset will be saved by Flow as collection anyway.
Saving as Collection
If you select Collection as your asset type, the selected asset will be visible in the Browser as the collection with all it's objects inside. It is recommended if you are saving more than one object as one asset. Mind that Collections will not be visible in Browser in Blender 3.0 and 3.1, then you should consider adding asset as object.
Saving as Object
When you are saving the asset as object, you should use only the single objects as one asset. If you will try to add more than one object as one single asset, you will be notified by the plugin, and then ONLY the first object will be renamed and marked as asset. You can select Batch Add Objects, if you want to add several objects at once, each as single asset.
Batch Adding Assets & Materials
You can add to your library multiple objects and materials within one operation. Then each object and material will be saved separately, using the Objects or Material name - there is no way to rename it with the plugin, so be sure to prepare the objects naming before.
When batch adding models, the addon will use all the selected objects.
While adding materials, all materials from the selected objects will appear in the addons popup, so you will be able to select which of the materials you want to add to the library.